28 April 2020
26 April 2020
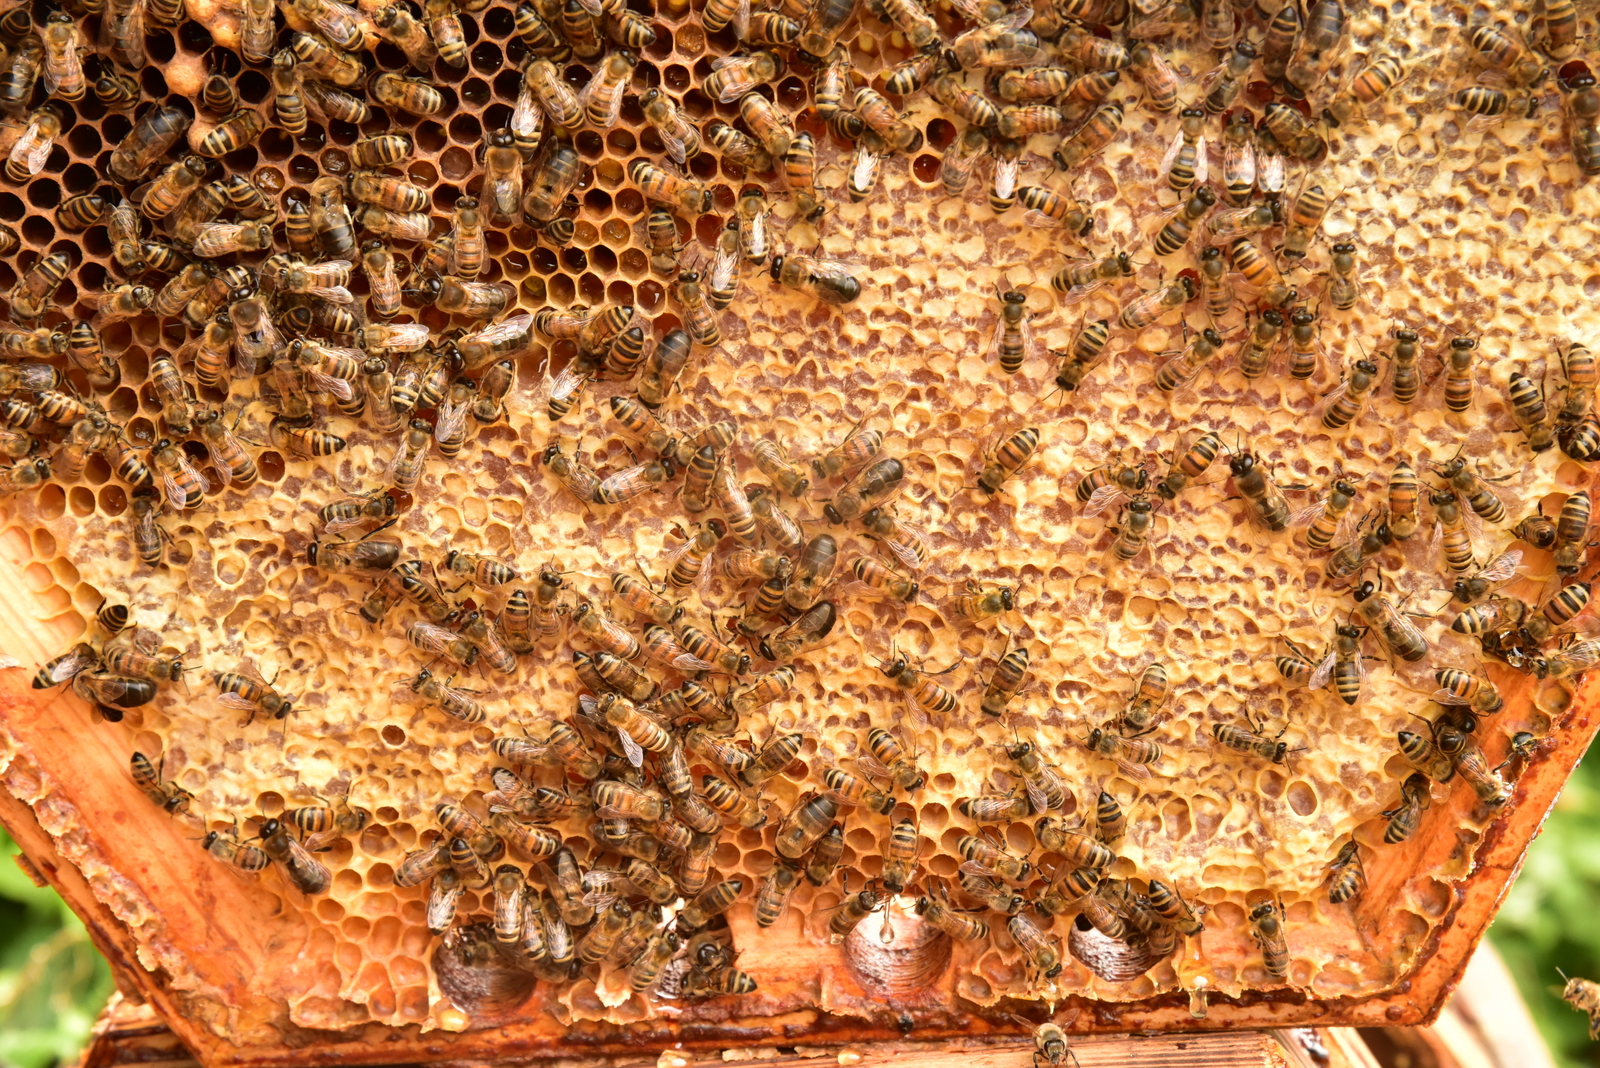
Cathedral TopBar Bee Hive Progress.
Having a boat project ongoing the bees have very much been left to their own devices since December when I simply added some insulating foil and plugged spare entry points to the hive. Minimal amounts of honey were taken last year and so plenty of stores helped through a very wet period in early spring. I was fearful of disturbing them at all for fear of seeing losses but delighted that all three colonies survived and quickly began working immediately there was a weather window.
April 26th sees me harvesting a spring crop of honey but one of the hives troubles me in having some untidy combs that the bees seem to have started to break down. I wonder if they are in the process of cleaning out comb which has grown excess mould in the very damp conditions earlier in the year.


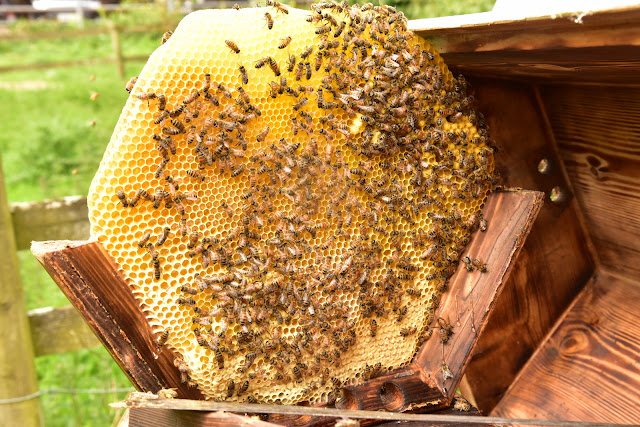


April 26th sees me harvesting a spring crop of honey but one of the hives troubles me in having some untidy combs that the bees seem to have started to break down. I wonder if they are in the process of cleaning out comb which has grown excess mould in the very damp conditions earlier in the year.


25 April 2020
How to Varnish boats
Varnishing is almost a black art to the beginner faced with a boat. Awkwardly shaped and not just a square box. The challange becomes one of how to cover those awkward bits where varnish will try to puddle, run or be difficult to reach at all. Then there are the edges, where the brush should end up at, and not begin its stroke. This first word of advice is a clue to several other techniques that should be observed. The contrary point is that an inside corner is where the brush should begin its stroke and the varnish worked away towards the open and flatter areas.
The brush should be held lightly and allowed to trail at its edge and there are two distinct stages of first putting down, and secondly, of spreading out as evenly as possible onto the surface as speedily as possible, consistent with being unhurried and not slapdash.
Most of the time thinners must be added. A first priming coat to bare wood needs to be applied with somewhere between 25% and 50% thinned.
Varnish is generally too thick to be applied without any thinning at all. So I apply all intermediate coats with about 15% thinners added. The final coat is best applied 25% thinned.
A patch of about 2ft X 3ft should be worked until there are no thickly covered areas likely to run and cause dribbles. The brush should carry no more than 3/4 of an inch dipped into the pot and applied boldly in strips; these widened from about 3 inches to 5 or 6 inches. The next strip is positioned parallel about three inches away so that a gap of uncovered surface separates the two strips. The brush is then worked at right angles to the strips joining them up, spreading and avoiding the chance of applying too much. As soon as one patch is covered, move along to the next, blending in as much as possible. Only after some practice will this become automatic and second nature. Done correctly this method should allow one to cover greatest area in the shortest time.
Immediately after application, the varnish will begin to get sticky and more difficult to spread evenly. The good news though, is that initially, what looks striped with brush marks, will flow out as the varnish settles itself onto the surface.
 |
After approximately 8 coats the surface is still not even |
 |
Nice colour without any stain added |
 |
The varnish is still slightly tacky at this stage but will improve slightly once fully dry |
Over many years of practice I have experimented with some novel ways of getting that elusive "grand piano" surface. Dust is the enemy. Preperation is key. Vacuum the surface, wipe with "tack rag", or simply brush across the surface with the bare hand, and the dust will be felt for certain. Get rid of much as possible - every little speck. While getting a new dinghy looking its best I have been known to suspend it inverted from my garage roof and varnish from below in order to try for that dust free finish.
After an area is completed it should be looked over carefully to spot any runs or dry patches. Runs can sometimes be corrected with a moderately dry brush or if the drying has made the surface too sticky - left till properly dry before sanding off with wet/dry paper. Beneath the run there is usually a residue of sticky varnish. Remove it by applying thinners on a dampened rag. Allow to dry for several hours before further rubbing down to a matt surface.
After each coat is fully dry - usually 36 hours is enough. Rub down with a medium wet and dry paper About 230 grade is ok. Put a drop or two of wash liquid into the bowl of warm water and if the hands are skinned by the paper wear plastic or rubber gloves to protect your skin. Take off all the shine so as to produce a milky slurry, wipe clean with a sponge and finally tack rag dry with some alcohol spirit applied sparingly. As suggested already dust off properly before applying the next coat.
Varnish is fairly expensive but spending a little extra for better quality is best policy. Tung Oil is often found in best quality varnish, helping the flow properties.
Much of what is suggested here will hold good for single pack Polyeurathane or twin pack Epoxy varnish, but the latter cures by chemical reaction, not air drying. A thicker coat can therefore be built up a little quicker. I know proper boat builders will apply several Epoxy coats, soon after each undercoat is dry. Only then is the wet and dry sanding begun to flat down the surface for the final two or three coats. The big benefit of Epoxy is its durability, as a carefully looked after craft will still look good after five years - conventional single pack varnishes - not so long.
How many coats of varnish in total? Eight will do but for the best finish probably double this number!
There is of course always the Rowan Atkinson Method (RAM) where Mr Bean applies just one coat!....Fabricate one improvised explosive device (IED) and place it beside a paper cup of varnish. Light the blue touchpaper (BT) and quickly retire to a place of safety (POS).
Notice that even in this extreme example, preparation is key to succcess.
20 April 2020
Woody Runabout Phase 13
20th April 2020 has me in varnish mode. Once again the laborious rub-down between coats and waiting for successive layers to properly dry takes time. The gloss surface immediately reveals minor defects; hopefully they will add charachter and not detract too much from the lovely rich Mahogany colour of the transom and side panels. As well as a some other instruments to mount on the dashboard I was fortunate to win an Ebay Auction of a classic 1960s Sestral Junior compass. All thats required to get it into perfect working order is top up the fluid with white spirit.
 |
Sestrel Compass |
 |
The skinny little gunnels will eventually be wider and deeper with the addition of Mahogany and Sycamore edging for a nice contrast of light and dark coloured timber |
 |
Soon to be righted by suspending with a couple of slings and withdrawing the jig from below |
 |
Rubb strakes are of polyethylene plastic |
15 April 2020
Woody Runabout Phase 12
15th April and well under way with veneering the side panels with Mahogany - more like paper hanging than woodworking - done with the help of a razor plane and scalpel, glueing on the ply with Instant impact adhesive. No second chances to adjust fit.
I shall be sealing with Luberon Sanding Sealer prior to applying varnish. Turning right side up will hopefully take place towards the end of this month (April).
 |
Veneered starboard side panel |
 |
| Port side veneer almost completed |
 |
Silky smooth finish ready to be sanding sealed |
 |
Transom now cut down for outboard with fifteen inch depth |
 |
Varnishing should take about ten days before turning right side up |
8 April 2020
Grandads Runabout Phase 12
8th April 2020 Progress slows as the underside is prepped for finishing. Yet to be fixed are the plastic rubbing strakes, the side panel Mahogany veneering and an imperfection to one side where the lines show up a hollow of about two square feet. I am adding a patch-layer of ply to build up here and Once it has set the fairing in process will begin. The underside is painted with five coats and is to be given two more, over the next few days. The transom is being worked on with inside knees attached to gunnels, and those pegged with bamboo “nails”. The final layers of five mm ply facing are in place and the whole structure is now very rigid and reinforced to accommodate the 20 hp outboard.For the moment the Mercury motor is held at the Exeter retailers , due to the lockdown Virus Pandemic, but hopefully I shall be able to collect it by the summer. Similarly the trailer (bought on Ebay) which is held up in Southampton and also awaiting my collection.I have chosen to use Evo Stik - Timebond impact adhesive for the veneer. Though application of the veneer will need very careful alignment of each strip. The alternative of vacuum pressing the veneer into place using normal setting adhesive is something I have discounted thus far. If forced to do so I shall need to acquire a pump, tubing, polythene film and sealing tape; almost impossible to do at this time.


3 April 2020
WoodyRunabout Phase 11
3rd April sees me preparing the underside for painting an Ivory colour and ready to veneer the side panels with Mahogany, prior to laying on Epiphanes varnish.
The gunnels are fitted ,but will require additional layers once the woodshop re-opens.
The gunnels are glued and pegged with bamboo pins, avoiding screws in all but high stress areas, such as the prow and transom. I shall use screws for fixing the thwarts and dashboard because these need to be removable.
 |
Transom marked for the cutout in way of the outboard motor. |
 |
| Bottom panels prepared with Pre-Coat white base |
 |
| Gunnels glued and pegged in position |
 |
Spray rails and keel ready for the plastic keel bands |
Subscribe to:
Posts (Atom)